Showing posts with label Felt Experiments. Show all posts

Monday, August 17, 2015

Sea States

ss9  

Recently, I heard blue water sailors discussing sea states. I was intrigued by the term and investigated the Beaufort scale. I love the idea of the sea having a recognized state of being. Water movements, air movements and waves in varying degrees of calm and violence. A beautiful and ancient metaphor for our psychological states, based our own continuously shifting conditions. 

 Katia Mokeyeva and I have a shared exhibition at Timeless Textiles in Newcastle, Australia in March 2016. In our conversations around this exhibition, Sea States presented it self as the perfect theme. We both live and create on the Pacific Ocean, but in very different coastal environments. Our collaborative felt collection will be exhibited on another part of the Pacific. A clear artistic narrative developed out of this geographic triangle; one that explores this common relationship with the sea, and its states of being. Sea states refer to the overall condition of a large body of water—with respect to wind, swell and current—at a particular moment and location. Each sea state offers a beautiful metaphor for our own personal, overall condition, and an excellent platform for exploration in surface design through feltmaking. It's a very exciting project. 

 And it has to start somewhere! For me the long process of building a new exhibition collection begins with this dress. A transition piece from the SHIFT exhibition 2015 to the Sea State exhibition 2016. 
  ss1 

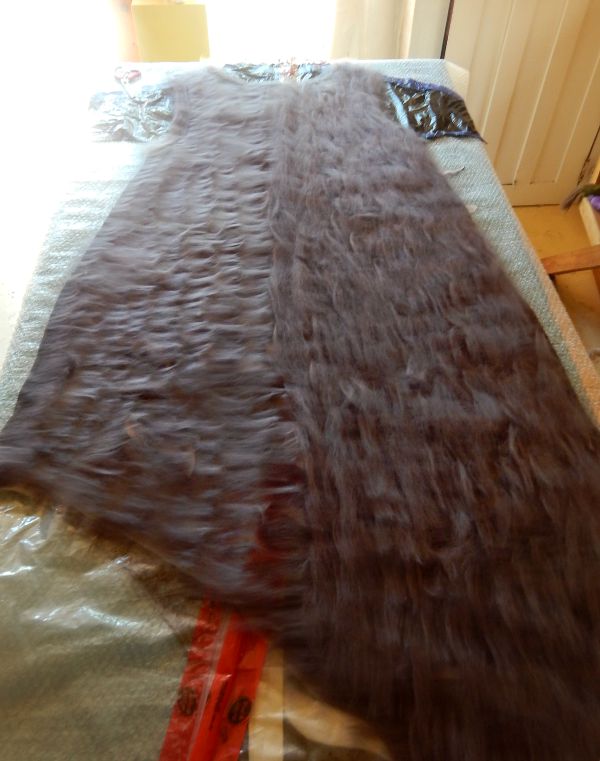
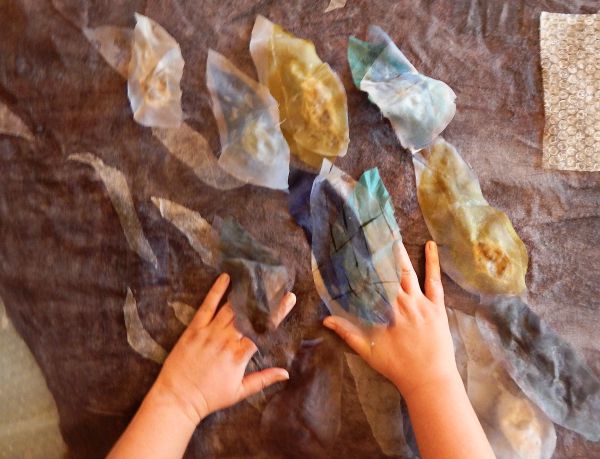
A long dark steely grey layout...itself like a great sea swell. The darkness is so atmospheric...like a wintery sea, under overcast skies.
 ss2 
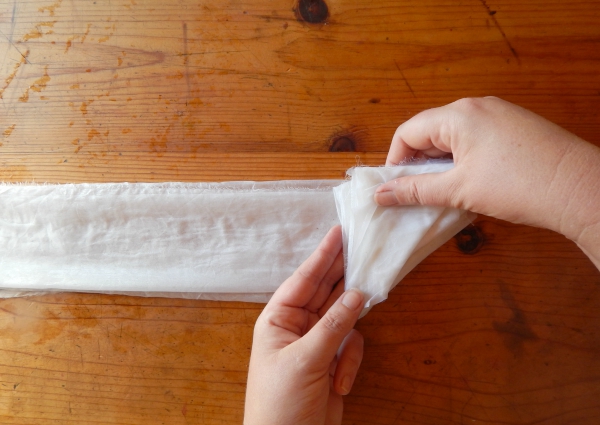
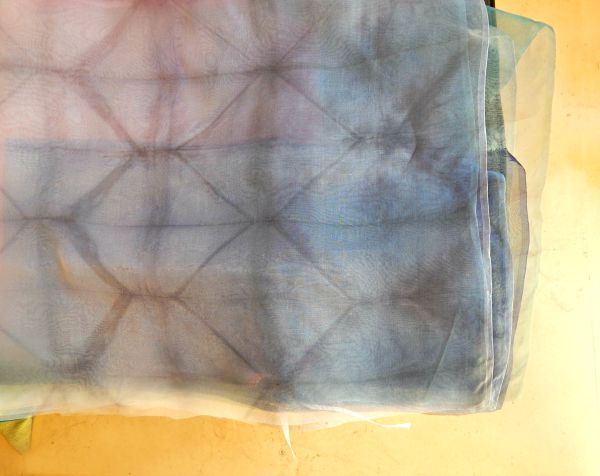
ss5Texture is absolutely key to this piece, so to add more dimension I shibori dyed some of the silk organza that would become the wave forms. 
ss3 

The beauty in creating work for exhibition is the opportunity to take time, and work with complex surfaces, in ways that are hard to justify with more everyday felt works. 
ss4 

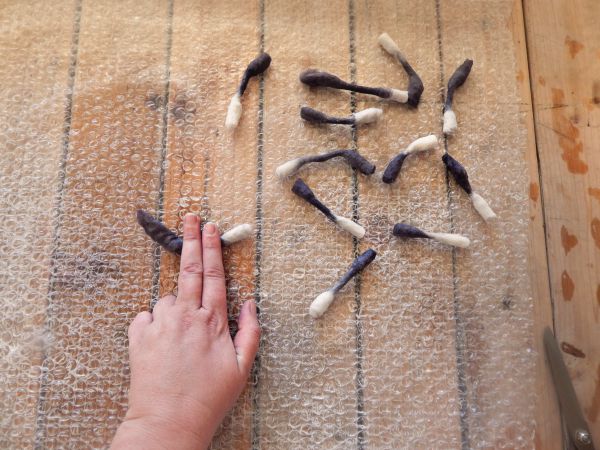
Slowly and gradually, I built up the wave forms. Each one requires gentle and patient hand work to create the connections of the organza waves to the felt base. This slow time is perfect for thinking/sinking/diving deeply into the theme. What it means for this piece and where I might go with it in the next work.  


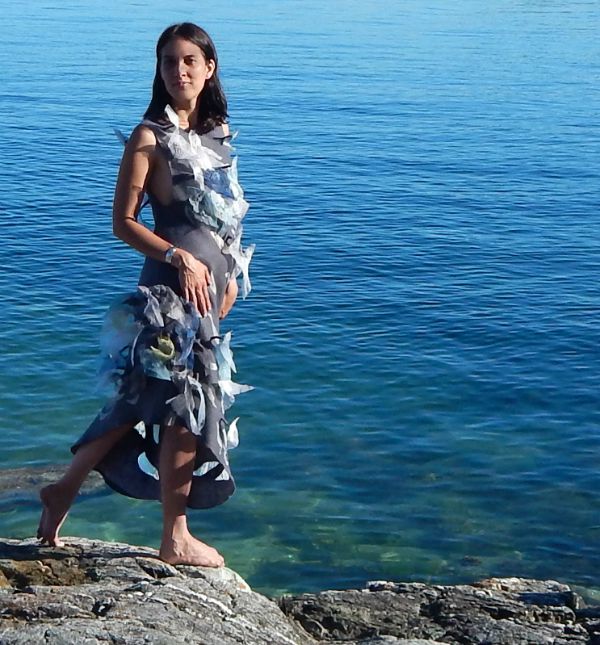
 The finished shift dress has many layers; transparencies through overlapping crests high above the surface. 
ss6 

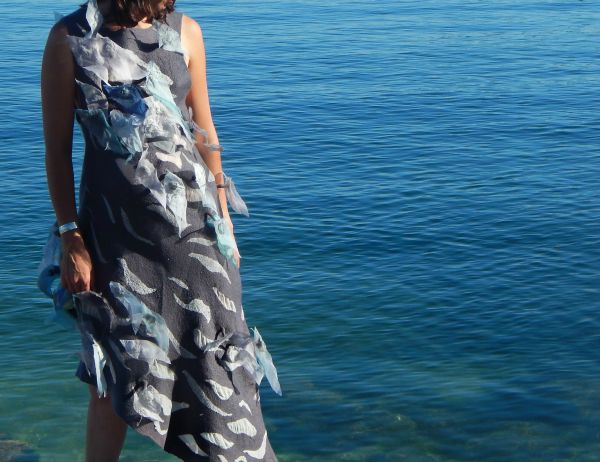
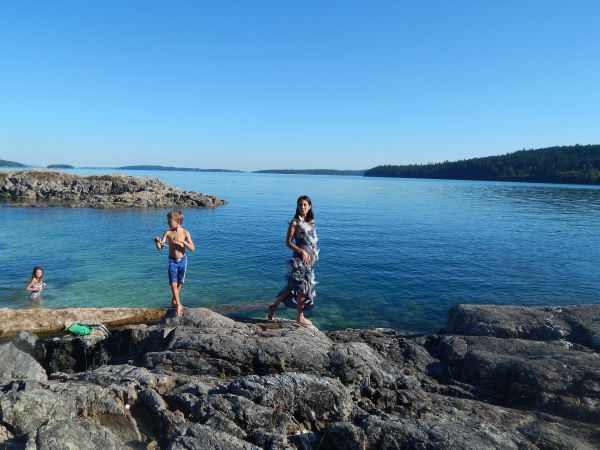
Rachel is my most wonderful model. She is always calm and elegant, impossible to fluster. She keeps her internal sea state at about 1! 

What you don't often see in any of our photo shoots is what is happening on the edges. This photo shoot included a family picnic at the beach....and while Rachel settled into her demure sea state beautifully, there was a lot of action around her....Sea state here is a perfect metaphor for how we hold ourselves as parents...our internal composition while surrounded by blustery winds and strong currents! 
ss7 

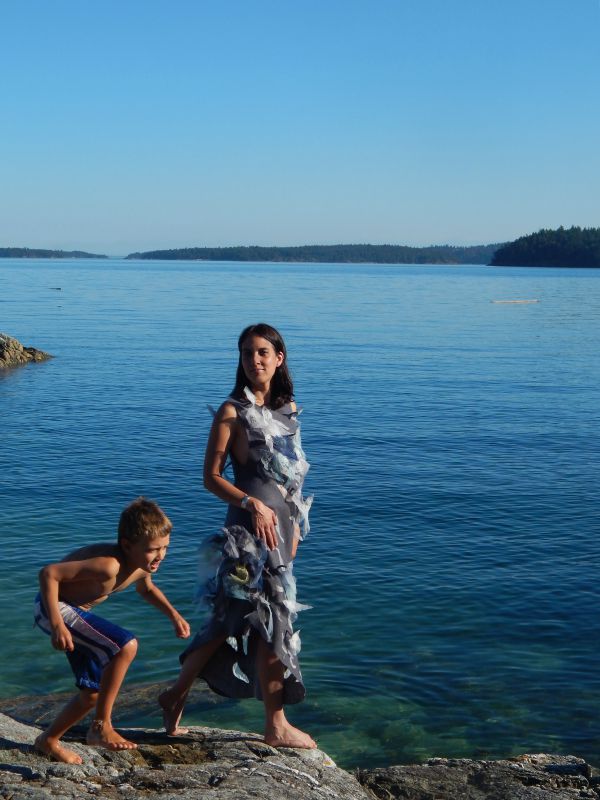
The uncropped pictures. I just had to share these with you...this is real life! The ebb to the flow in the thoughtful, reflective felting time in the studio!
 ss8 

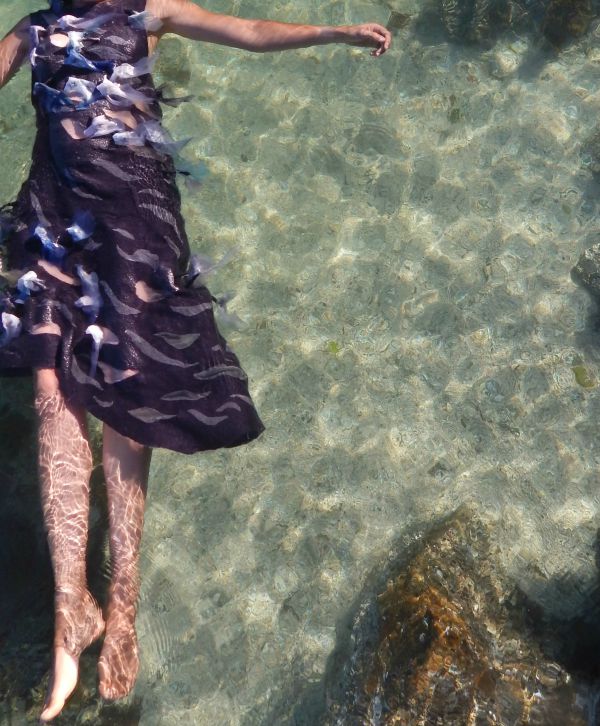
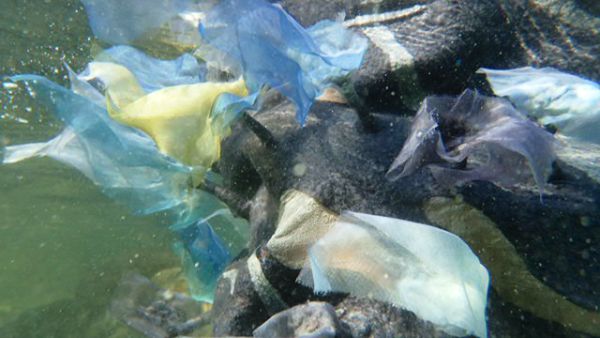
The dress holds upright the dimensional scupltural forms. They wash over and around the dress like a great wave....And then, once underwater, the wave forms take on a whole new aquatic life...like waving bull kelp... 

 "Kelp’s survival depends on flexibility and extensibility. Each alga can grow up to 20 to 45 m (22 to 49 yd) long and consists of a holdfast, stipe, float, and fronds. The holdfast uses a flexible network of root-like haptera or anchors to attach the kelp to the ocean floor. By being flexible, the haptera allow the kelp’s base to rotate slightly, thus providing some protection from the high torque created by waves." (Biomimicry Guild Report) 

We all need this kind of anchor, and flexibility. 

ss12 

Now, whenever I look out at the water, I try and determine the current sea state. A new way of viewing a familiar environment. I would say this dress has a sea state of 3. There are much more wild conditions to come .....


Wednesday, June 10, 2015

Peaks & Valleys :: Surface Design Online Exhibition


This is a very special project. The first online exhibition of the Surface Design Online Challenge.

The Surface Design Online program is all about experimentation and pushing yourself further into techniques, whether they are new to you, or familiar friends.  I created this challenge and exhibition to continue this exploration with participants from the previous classes.

There is nothing like an exhibition with it's deadlines and parameters to make us stretch our creative thinking. This is  about pushing ourselves to create beyond our usual scope. Challenging ourselves to make something better or different than we have before...work in a new direction, a new scale, take techniques further, shake up our creative practices. Hit a few walls...and break through them.  This stretching is how we all grow as artists....

This is the challenge that was set for the participants in this years exhibition:

Peaks and Valleys. Mountains and Plains, Crests and Troughs. Highs and Lows.....we have all experienced them, whether geographically or emotionally....and creatively!  What could be a more appropriate theme in dimensional surface design than this! Explore the theme as literally or metaphorically as you wish.

And they did. And did so exceptionally...  All from very different levels of experience and creative backgrounds....all employing techniques from the class, but creating work that is completely personal and individual. I think they are all brilliant!

Please do come by and take a look, read their words on how they interpreted the challenge, and share in our enthusiasm and passion for this medium.

Peaks & Valleys :: Surface Design Online Exhibition

Warm wishes, 
Fiona

Note: We will do this again next year, and the exhibition is open to everyone who has taken, or is currently taking the Surface Design Online class.

Sunday, July 20, 2014

Rift : A SHIFT dress


  The layouts in this series of dress sculptures were so complex. There were often multiple layers of resists, or else multiple layers of patterning. The designs had to be thought through in that reverse thinking way required when working with resists, and also with transparencies, opacities, and inclusions.  My brain was burning with keeping it all held in order to get to the end result. Thinking through on what will show on which side of the garment and where, and what will happen if it is overdyed. Where would each design element fall on the body when shaped into the 3 dimensional and worn. Left and right, front and back, inside and outside....all parts were relevant...all at one time. 


 The lightest layers of wool roving made me think of skin tissue healing. So relevant to this dress full of (beautiful) scars and my intentions. 


   This dress is made of shadowy shards. Like flakes of obsidian. But cradled within a softer surface....Black and white forming shades of grey over time.  Geology is just so prominent in many of the SHIFT dresses. This piece has elements of all rock formations, sedimentary, igneous and metamorphic; tectonic shifting, escarpments...  It is hard, sharp and cut, but softened around the edges in overall dress form, like a tumbled stone.  Geode like inclusions; seams of precious earth....scars, dreams, wishes...life in general. Not simple.
 They are pushed up and out of the base textile; carved and twisted through the fulling.  Complicated, (if you chose to think about it) like the shadowy base.


  This dress is sinuous and feminine on the wearer, and full of tactile metaphors.  I like that it can be just a beautiful dress, and can also hang as a sculptural form filled with intention.  


  The techniques used in this piece will be part of the Fall felting retreat in Quebec this October. I'm trying to get the details posted about this as soon as possible....there's lots going on right now...lots of big events vying for my attention...but this is up next! 

  It's not all serious thoughts and introspection! I've got lots of plant dyeing lined up for the next few days...some summer lightness...warmth, sunshine and flowers; folly and experimentation!
Warm wishes, 
Fiona
 

Wednesday, May 28, 2014

Experimental Garment Construction Workshop


  I'm really looking forward to this workshop. We have a great space- very large, open airy and bright. Lots of room to move and work and think.  Plus it takes place at the same time as the opening of my upcoming exhibition at ArtCraft.  This exhibition is a collection of sculptural garments, accessories and small sculpture. The elements I am working with now in creating these pieces, will be those we'll view and explore in creating interesting shaping in our garments in the workshop. 

  Here's the workshop description:

  Sculpture for the Body explores the manipulation of the surface of a garment; building up organic shaping that alters the structural lines, beautifully, dynamically and unexpectedly.  We’ll create highly wearable art pieces exploring architectural and sculptural design in wool. Layers and shaping will be created with prefelts, cords and gathers, shibori, folding, cutting and stitching. We’ll cover seamless garment construction while making a garment design of the student’s choice-dress, jacket, vest or skirt.

  I am most excited about the range of possibilities in this class. You could come just for the basic garment construction and learn how to make a fit-to-you jacket, dress, skirt, vest, or....
  And then as much and deeply as you want to, we will cut and shape and manipulate to add new form and architecture to the garment. Clean, wild or elegant... 3 days of creative feltmaking.

  I'm so looking forward to sharing this time with some of you!
 
Dates: July 10, 11, 12
Location : ArtSpring, 100 Jackson Ave, Salt Spring Island
Fee:  $325.00 plus materials fee: $65.00

For more information and to register:
www.fionaduthie.com/experimental-garment-construction/

Warm wishes, 
Fiona


Thursday, April 17, 2014

Wool Roving vs. Wool Batting


Comparing wool roving and wool batting was once one of the foundations of the Surface Design class, but that exploration felt most possible for in person classes.   I include the fibers in the online Surface Design class, as I think it's a benefit for everyone to experience working with fibres in their different forms.  In working through the class materials, I decided to do a little test to see what differences I would find when working with roving and batting, in a documentated study! I used 16 grams/ 0.5 ounce of extra fine merino roving, and the same amount of extra fine merino batting both from the wonderful DHG. 
(see sources at the end!)


 Wool batting has been scoured, dyed and carded. It comes in big sheets or rolls. The wool fibres are not directional, or straightened.  When we are felting we want to have our fibres laid out in different directions to allow for the greatest connection of the fibres and their scales as they integrate to become felt.  With batting we don't need to pay any attention to the direction we lay out the fibres as they are already blended.


 Batting is fantastic for quick layouts. The batting can be spread out to your desired shape and size, and layers can be built up to reach your desired thickness.  To layout the batting, spread your wool out on your work surface. To remove extra fibre, use one hand as a clamp, held flat and firm on top of your fibres, and use the other hand to pull away the excess fibre-image left. Increase your layout size by laying on more batting, overlapping by about 1 inch (2.5cm) -image centre.  If you have any thin spots or holes, fill in with wisps of the wool batting- image right. Very fast and easy.

Wool batting is especially useful for quick layouts for all flat feltmaking projects, like wall pieces, playmats, or making your own prefelt. It is also excellent as a base for vessels, hats and bags.
Wool batting is generally not as readily available of wool rovings, sliver or tops.  Several breeds can be purchased in wool batting form, including Merino, Merino blends, Corriedale/Coopworth, Bergschaf, Norwegian C1, and Norwegian C1-Pelsull, Finnish and Icelandic. (resources below!)


Wool roving has been scoured, dyed and carded, and combed, so the fibres are all straight and aligned in a single direction. It comes in long lengths, sometimes rolled up into balls. We can layout one layer of roving if we want to create a very fine light felt, but most often we will lay out multiple layers, with each new layer perpendicular to the last.  This creates the greatest potential connection of the fibres and their scales as they integrate to become felt. The fibres will shrink more along the length of the fibre and we can use this to influence the size and shaping of our felt work during layout. In general though, we want consistent, even, perpendicular layers.

There are several ways to layout your wool roving. The most common form is called shingling. We use one hand as a clamp and pull away a staple length of wool fibre. Each shingle overlaps the previous one by one third -image left. After laying out all the fibres in one direction, we'll lay out the second layer of wool shingles, with the fibre direction perpendicular to the previous layer- image right. Two layers will create a lightweight consistent felt. More layers may be used either depending on the thickness of each shingle, or the desired thickness of your finished felt.


If I use the same weight of wool fibres, and start with the same size of layout, my end result should be the same with either wool roving or batting.   I used exactly the same felting techniques for the same durations in both samples. The batting was faster to layout. The roving developed a more strong felted skin more quickly. The batting felt more cohesive and started to full or shrink sooner in the process. They were both finished in the same amount of time, and the finished size was the same in both samples, with equal shrinkage in the width and the length.


My batting sample was more even in finished density overall. If I had of been a little more attentive in my layout of the roving, I think it would have been as consistent, if not more than the batting. But I was working quite quickly, so in this case the batting had a slightly better end result. 


After fulling completely, rinsing and laying flat to dry, both samples are tight and evenly finished. The batting appears just a little more smooth and flat.

So... no dramatic results! The same amount and size of sample produced a similar end result, as happens when an experiment goes exactly as you think it will!

I chose between roving and batting based on two main criteria. The first is availability. What fibre form  is available to me in the  particular wool breed I want.  I love C-1/pelsull for bags, and that is most readily available in a batting form. But I also make most of my bags in white and then dye them after, and for those I use Finnish wool, that is most readily available as a roving. The second  criteria is the density of the finished felt. When I am making the lightest weight, structural felt garments, I will use an extra fine merino roving. I feel I have the most control over the density of my felt (when I don't rush!) using the wool in a roving form.

It is valuable to touch and work with the different forms. Laying out with locks alone is another great experience. Exploring and using the different wools informs our felting sensibilities and understanding of the fibre qualities, as well as deepening our physical appreciation and hand recognition of the wools.

Here are some sources for you:
Batting:
Merino: Dyeing House Gallery (Italy) 
distributed in Canada by ArtGus Studio 

Merino: New England Felting Supply

Merino Cross: Living Felt

Norwegian C1, C1-Pelsull Blend, and Pelsull: New England Felting Supply

Bergschaf:  Dyeing House Gallery (Italy) 

distributed in Canada by ArtGus Studio 

Finnish: Piiku (Finland)

Icelandic: Alafoss (Iceland)

Rovings or Tops are much easier to come by, and there are many wonderful online sources, including most of those above.  Too many to list here, but I do purchase most of the coarse wool breed rovings from:
www.worldofwool.co.uk

Lots of felt with!
Warm wishes, 
Fiona


Thursday, April 10, 2014

Inkjet Transfer Paper Explorations


Teaching a most marvelous experience! It invites to teacher to share their skills and provides wonderful opportunities to refine our techniques both before the classes in preparation, but also during....

The spring class of Surface Design Online is in session, and it is just so much fun...It is amazing to see so much beautiful work, and to see connections building between feltmakers from all over the world.   One of the techniques in this class is using Inkjet Transfer Paper for adding text and images to your feltmaking. I started playing with this a few years ago with my Storytelling Bags series.   I've always wanted to explore this in a different way and the opportunity presented itself this afternoon.   

I've been wanting to see how different drawing tools could be used directly on the transfer paper...and what results the different mediums would give... So we tried some crayons for fabric, sharpie markers for fabrics, regular sharpie markers (permanent), and ink and paintbrush.  We tried pencil crayons and pens as well, but their points were too sharp and tore up the transfer paper. ("We": I even got my two teenagers excited about this and playing with textiles with me! Excited may be too strong a word, but I'm sticking with it!)


With this method, text can be easily mirrored. Write your desired words on a sheet of ordinary copy paper, hold it up backwards in a window. Place the transfer paper up to the lettering, making sure you are drawing on the correct side of your transfer paper for transferring, and copy using your desired drawing medium.


Cut out your drawing and iron them onto your silk fabrics as per the paper instructions. In this case we ironed each section for 2 minutes or so, on the highest setting, with no steam. Remove the paper from the silk fabrics, and cut out around the image, allowing at least an inch of non-printed silk for the wool fibres to migrate through during felting.
 

Felt as usual...
 

and....taadaa.....hand drawn images and text on your nuno felting! How incredible is that!  This has a different effect than just using fabric markers on your silk directly, as you can use many drawing mediums, plus you get interesting surface reliefs from the transfer paper.

In our experiments, anything with a brush tip worked equally well. The regular sharpies were a little too pointed and tended to gum up with the polymers from the paper, but did give very refined lines and brightly coloured images. The crayons are one of my favourites... I like their folk art qualities..the slight transparency in the drawing strokes combined with good strong colours.


This is what it is all about....exploration, experimentation and sharing....We are always students...even when we are teachers!

We explore this technique in much more depth in class, but I thought you all might enjoy seeing this, as it's so simple and beautiful! 

In this sampling we used Lesley Riley's TAP as our transfer medium.

Happy felting, 
Fiona

Monday, March 10, 2014

Felting in the Rocky Mountains

view from my classroom

I've just arrived home from a very beautiful trip. As mentioned before, Texas was fantastic- such a great group of creative people.  I had a few days before the beginning of the Felters Rendezvous and I had some writing to complete, so I created a little writer's retreat for myself in lovely Estes Park, Colorado. I had four days of felting, writing, good coffee, beautiful views, and silence. It was delightful! The sunshine, snow, mountain vistas and crisp but not cold temperatures were invigorating. 

Chapter 5 of the book complete, I headed further into the mountains to Rocky Mountain National Park and the Felters Rendezvous. After four days of silence I chatted (far too long and late) with felting friends, Heather and Tylar, as well as new friends, Cathy and Marsha. It was lovely to be with them all, and a highlight of my week to finally meet Heather in person!
 
before the classes, set up and ready....what a great space!

My first class was in felt bags. It was a full house and a very creative and exploratory group. In construction we had a variety of shapes, inner pockets, inner divisions, and outer pockets, and delved into some surface design play. There was a range of experience from beginner to master, and everyone challenged themselves to stretch their boundaries. That's a great thing in a class. No restraint was exercised and everyone made beautiful work.


Gorgeous and elaborate bags...it was such a fun class! For Dayle, in the top picture, this was her second felt project ever! Bags make such a perfect canvas for exploration of resists and surface design forms.

In days 3 and 4 we moved on to Surface Design.  Another full room, with some students continuing after the bag making, and some new faces to join our group.


A few of the extraordinary surfaces created on Day 3.  Over the two days, each student made two large felt tapestries, created as samplers to hold the multitude of techniques.


This whole event was extremely well co-ordinated by Deb Tewell of The Felting Source. Thank you Deb, for all your assistance, and the time and effort that goes into creating such an event! Next years dates and teachers are all set- It promises to be wonderful...and always a beautiful and inspiring location!

And now here I am...back again in my little studio on this little island.... gearing up for Surface Design Online-Spring and creating a new body of work for my exhibition this summer.  Life does not get better than this, and I thank you all for being a part of it!

Warm wishes, 
Fiona

Tuesday, February 18, 2014

Surface Design Online: Spring Session


Registration for my Surface Design Online- Spring Session is now open!
The class will start on April 5th and run until May 17th. 

All of the workshop information is available on my website:
http://www.fionaduthie.com/surface-design-in-feltmaking-online-workshop/


I'm holding a little draw to thank everyone for their enthusiastic support of this new class.
There will be two opportunities to win a free class:

One winner will be drawn from those who:
Like my Facebook page, and share the link to the class information on their timeline. Leave me a comment on FB to let me know you have shared.
The name will be drawn from those comments.

One winner will be drawn from those who subscribe to my workshop information newsletter using the link on my website or at the bottom of this post.

The draw will take place on Wednesday, February 19th, at 9:00pm PST. I'll post the winner here, and on Facebook.


I love sharing this material with you. It forms to soul of my work, and it is like a dream to get to run these classes in this way!
Thank you again!

February 19th update:

FaceBook winner is......Nell Burns
The newsletter winner has been contacted by email and I am just waiting to hear back from them, before announcing!

Thank you everyone who took part in this! Your support is very much appreciated.

Watch for lots more felt happening around here in the coming weeks!


Warm wishes, 
Fiona

Workshop information Newsletter:


Saturday, January 4, 2014

Surface Design in Feltmaking Online Workshop

  I'm so excited to be able to offer the Surface Design in Feltmaking workshop  in an online format.  It's taken many months of thinking and planning to get everything in place, with the teaching materials presented in a way that I feel best meets the needs of the students. 
  It's so important that each idea is well covered, with every question answered, every pitfall troubleshooted. I've gotten there, I hope, with a combination of instructional PDF's with lots of pictures and detailed, clear text, a video demonstration, plus private blog area to share finished projects, questions, answers and inspiration.  

  This is an intermediate level class-for those with some feltmaking experience. If you are a beginning feltmaker, I will have a free introductory mini class available in the last week of January that will prepare you for this workshop. 

  This workshop is for people interested in deepening their knowledge of fibres, learning new techniques to add to their craft or art practise, or those just wanting to have some fun exploring new ideas.  We make a 6 x 6 inch sample for each new technique to build a fantastic resource library, or inspiration board and then implement these techniques in a finished felting project in the last week.

The class is six weeks long and is delivered in one week modules for this session:

Week 1:Fibres and Surfaces
short and long fibres, combining felting and non felting fibres, shadowing,silks and cottons-quilting, folds and ripples, photos and text
Week 2: Surface Resists
wool breeds, plastics and foams,  craters, pockets, loops and bridges, gems and beads, tape,
Week 3:Nuno Felting Inclusions and Resists
Week 4: Wool and Prefelt Additions
prefelt, pencil rovings, yarns, locks, spikes, cones, blossoms
Week 5:Surface Alterations
holes, multilayered hills and ridges,carving, lace, shibori stitching and anemones
Week 6: Individual project
Each student will pick out the elements that they most want to explore further and integrate these surface design elements in a felt project like a scarf, bag, wall piece, sculpture. 

New material will be available each Sunday, with about 4-6 hours of student time required for design and feltmaking. You can decide when you work on each module. Work on one design element each day, or dedicate a day to work through the material all at once. As well as by email, I will be answering questions and giving comments throughout the course on the private blog, allowing all participating students to learn through one another's projects.

  The full materials list will be sent out with confirmation of your registration.
Materials kits with everything required for the workshop can be ordered up until January 15th, for delivery in time for the workshop starting date. 

If you have any questions about this class please just email me! 

Please note: This class is now full. 
Only use the registration link below if you have already contacted me regarding the workshop.
I will be offering this class again in April and September 2014! Thank you to everyone for the enthusiastic response!

Workshop Dates:
February 2nd- March 9th,
Online materials and resources will be available to students until August 1st, 2014

Workshop Fee: $125.00